Would you like to have a flamboyant but you don’t have enough space for it to develop well? Well, I have the perfect solution for you: work it like bonsai. I’m not fooling you: it’s not a particularly popular tree in this world of miniature trees, but… it is used.
The question is: how do they do it? How can we get a flamboyant bonsai?
How to make a bonsai with a flamboyan tree?
The first and most important thing to do is, of course, buy a flamboyant . But we will have a small problem: the flamboyants that are sold in nurseries usually already measure 2-3m and have a trunk thickness of 3-4cm, that is, they are garden trees. They could be lowered in height, but the cut it would fit would make the future bonsai look a bit bad.
To avoid this, I recommend more to reproduce it by seeds, cuttings or air layering. In these last two cases, the branch must be 1-2cm thick. If you don’t know how to do it, in this other article dedicated to this magnificent tree we explain you step by step how to proceed. Once we have our future bonsai, it will be time to work on it. But how? Well, so as not to complicate things too much, we will give it a natural style , that is, as it would look in nature. So more or less:

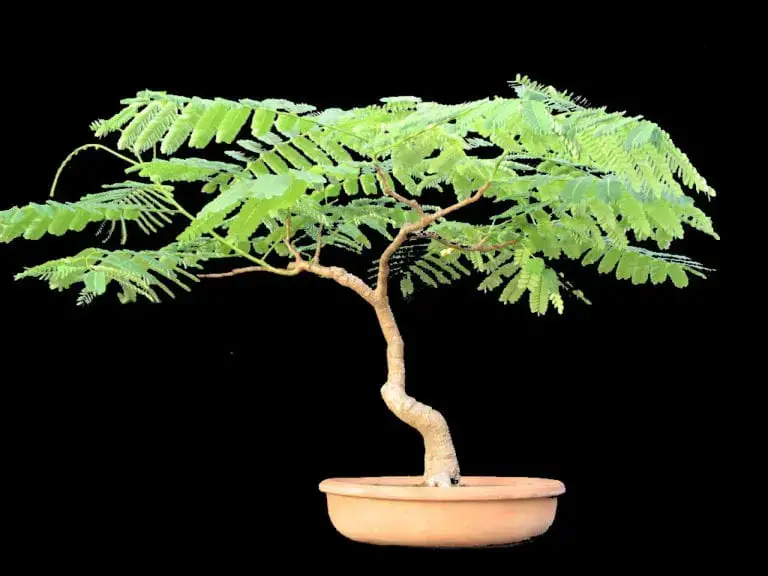
The crown, as we can see, is parasolate, the trunk slightly sloping and with 2-3 main branches. Well, this is what we have to achieve. To achieve this, it is essential that while it is young (it would be, more or less, at the second year of age if we have taken it from seed) we remove the first two-three leaves that grow from what will be the main branch . Thus, we will force you to remove new branches.
From then on, what we will do is trim the branches so that the tree does not grow so much in height, letting 4-6 shoots grow -leaves and / or secondary branches-, and removing 2-4 from it. All this will have to be done by having the tree planted in an increasingly large pot (40-45cm in diameter), until the trunk is at least 2cm thick. Little by little, we will see that our future bonsai is taking shape.
After a year, we can start talking about transplants to shallower pots and root pruning. Both tasks have to be done on the same day, in early spring. They seem complicated, but they are not so complicated. It must be done in the following way:
- Remove the tree from the pot.
- Remove the substrate, as much as you can, leaving the roots clean.
- Trim them a bit (no more than 3cm).
- Plant your flamboyant in a 20cm high pot, with a very porous substrate (it is advisable to use akadama, but you can use black peat mixed with perlite).
- Water.
The following year, it will be necessary to proceed in the same way, but this time, trimming the roots by 5cm and planting the tree in a shallow pot.

Image – Bonsai in the tropics
And ready. Then it will be a matter of maintaining the style through small pruning, both branches and roots, so that the tree can look spectacular in its bonsai pot.
How to care for a flamboyan bonsai?
To take care of your bonsai, we recommend the following:
- Location : whenever possible, you have to keep it outside, in a sunny area. But if there is frost in your area, keep it indoors during the winter, in a room without drafts.
- Substrate : it is highly recommended to mix 70% akadama with 30% kiryuzuna. Now, a substrate for bonsai will also work for you.
- Irrigation : in principle it must be frequent, especially during the hottest and driest months of the year. It does not withstand the drought, so that about two or even three weekly waterings will do well in summer. The rest of the year you will have to water less.
- Fertilizer : since flamboyan bonsai have a hard time flowering, it is advisable to use a fertilizer that is rich in phosphorus.
- Transplant : it must be transplanted every 2 years, when spring has established.
- Pruning : it is advisable to prune in autumn, but you only have to do small pruning; that is, you have to cut only tender and / or semi-woody parts, so that it can heal well and look as natural as possible.
- Rusticity : should not be exposed to temperatures below 5ºC.
What to do so that the flamboyan bonsai gives a lot of flowers?
A very common problem that occurs in the flamboyan worked as bonsai is that it either does not bloom, or produces few flowers. And it is that this is a tree that in order to flourish in conditions it needs, first, to grow at its own pace, without being pruned by humans, and secondly, space and nutrients to develop normally and, thus, have enough energy and means to produce flowers and seeds.
Of course, a bonsai is a plant that is pruned every year, since it is maintained with a certain height and style. The only thing that can be done to make it bloom is to fertilize it with a fertilizer that stimulates flowering ; that is, one that is rich in phosphorus, since it is used for the production of flowers .
However, it is important to follow the instructions for use. An excess of fertilizer is very harmful for the flamboyan bonsai (and indeed for any plant), since it burns the roots and causes them to weaken causing irreversible damage. But if you take the right dose and with the frequency recommended by the manufacturer, then you can get it to flourish.
When do flamboyans bloom?

Even if we fertilize it, the flamboyan bonsai will take time to bloom. This is normal and should not worry us too much. And it is that in a natural state a flamboyan can take up to 10 years since the seed germinated . Therefore, if you work as bonsai you will need more time.
So if we provide you with a series of care; that is, we water it and we fertilize it periodically, we will have a plant that, yes, it will need time to flower, but once it does, it will surely flower spring after spring.
So, do you dare to make a flamboyan bonsai?

One thought on “How do you make a Flamboyant Bonsai?”