Rose bushes are highly prized plants for their great beauty and for the fragrance of their flowers, widely valued throughout the world as one of the best decorative flowers. Its use is so widespread and specialized, that the usual thing is that most of the rose bushes that we see are not a single common species, but a graft of two or even three of them. This is done to take advantage of the roots and stem of stronger species and the spectacular flowering of other weaker species or, even, to obtain different roses, which are impossible to achieve otherwise.
If you want to learn how to graft a rose bush to be able to enjoy the best characteristics of two different plants, join us in this article in which you will see a complete guide with steps and tips on rose grafting.
When to graft a rose bush
The first question to clarify is what is the best time to graft rose bushes, since grafting is a very aggressive process for both plants, but especially for the grafted bud, so it cannot be done at any time of the year. To maximize the chances of success of the graft , we must look for the optimal moment for the plant.
In the case of rose bushes , this usually occurs in summer, after flowering . The best time to prune the bud and graft it is about a week after the flower wilts on the flower stalk in question.
It is important to have abundantly watered the plant the days before the bud removal, but on the day of the grafting it is better to do it without having watered the plant yet. The best times of the day for this are in the morning or at sunset. Knowing this, we can now delve into knowing how a graft is made in a rose bush.

How to graft rose bushes step by step
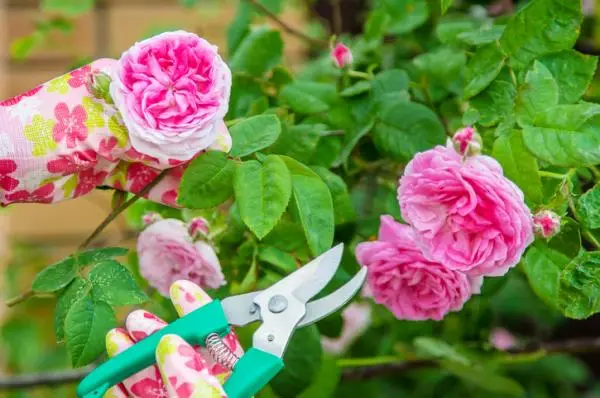
One of the most used methods when grafting roses is the escutcheon graft . This usually gives good results in this plant in most cases if it is done well. Follow these instructions to know how to graft a rose bush step by step :
- The first thing is to completely sterilize the tools you are going to use. You will need sharp pruning shears and a knife, also as sharp as possible. Tools in good condition ensure cleaner cuts, which is vital for the health of the plant. Make sure you sanitize them properly before you start.
- Once this is ready, you can proceed to extract the bud from the rose bush that we are going to graft. Cut the middle leaf bud from a stem where the flower has wilted about a week before.
- Prepare the stock, which is the plant that will provide sustenance for the new graft, thanks to its roots and stem. Sometimes male rose bushes of another species are used as a pattern, stronger but without flowers, although we can also use trees or shrubs of another type.
- For the gusset graft, make an incision in the shape of an inverted T or T, which is where you will place the graft. It is very important to cut only the bark and not the innermost part of the stem, otherwise the graft will fail.
- Open the lips of the cut carefully to seat the bud inside the cut, so that it fits as well as possible, trying to maximize the contact surface between the two plants.
- Once the bud is seated in the stock, reposition the lips of the cut and secure the graft with graft tape or other material, such as raffia thread. Hold the graft firmly in place with your thumb as you apply the support material.
- After two weeks, remove the tape to check the status of the graft. If it has been successful, it should be noticed already. If the graft has not worked, you will have to repeat the operation from the beginning with a new cut and a new bud.
- In successful grafts, between late winter and early spring of the following year, the pattern above the graft is pruned, so that from that moment all the energy goes to the grafted part.
This process is commonly used both when trying to graft a tall-standing rose bush , as well as when trying to graft a climbing rose bush . Sometimes we can even find ourselves before double graft rose bushes, in which the roots and base of the stem are from one plant, the trunk or main stem from another and finally the crown of the desired flowering rose is from a third plant, so it is they have had to do two grafts.

How to graft a rose bush to give two-colored roses
The gusset technique can also be used to graft roses of a certain color into a pattern with roses of another color. In this way, when the graft is successful, it allows the rose bush to give flowers of both colors , or even more if we make more grafts. Therefore, you will need to make a cutting of one of the plants with the appropriate cut for a graft, in order to then be able to graft the rose bush, as we have explained before, in the other plant.
Logically, in this specific case the pattern is not completely pruned above the graft, since we want to maintain the flowering of both.
Caring for a grafted rose bush
After grafting the rose bush, it will need some more specific care, since it is a process, as we have said, very aggressive for the plant. We recommend that you follow these tips on caring for a grafted rose bush :
- During the two weeks following grafting, the plant will need more frequent and abundant watering than usual. The aim is to keep the soil moist at all times, but always without flooding.
- During the first year, it is advisable to prune the first two or four shoots of the scion to give the graft time to fully settle.
- It is good to add some compost substrate or worm castings to the soil to give it extra nutrients.
- Finally, and as always, roses will need good lighting and an airy environment.