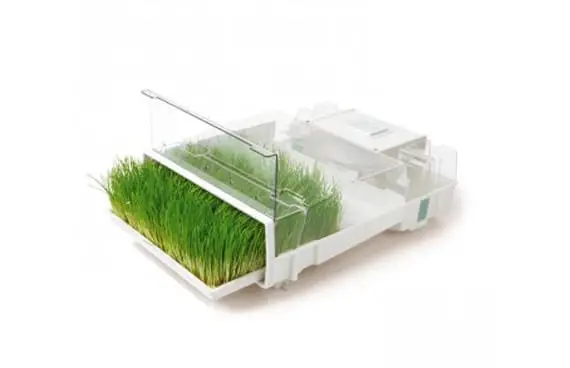

Electric germinator
Soy, alfalfa, lentils, red cabbage, radishes, chickpeas, broccoli, peas … germinated they offer us a huge variety of delicious sprouts, which also have beneficial properties to health.
But can we make them at home? Of course. We take advantage of seeds that we collect (or we directly use pea, chickpea, lentils …) and in two days we can start enjoying them now. December It is a good time to dedicate yourself to sprouts, because with low temperatures, garden activities are scarce, and sprouts offer us another form of cultivation.
For this, we will need a germinator: Can be commercial (small mini greenhouses that recreate the optimal conditions of temperature and humidity), or homea simple large jar with a wide mouth and a gauze or cotton cloth as a cover.
The advantage of germinator is that you can cut sprouts and keep the seed in the germination process, as if it were a small garden that provides you as you need it.
In boatsHowever, you consume them all at once. Of course, you can keep them in the fridge for up to 15 days.
The germinator
There are several types of germinators, from simple plastic or glass containers to start the crop, to trays for larger plantations, which even maintain the humidity and temperature conditions in an automated way thanks to a small electric motor. But they all work basically in the same way: they do not need substrate and are based on the constant hydration of the seeds, of course, taking care that they do not get flooded.
Depending on the species, the germination time varies from 2 to 7 days.
If you decide to buy your seeds To germinate, make sure they have an ecological seal and come from plants fertilized with 100% organic and biodegradable products, without trace of chemicals.
The process
Germinating in a germinator is very simple. Each seed requires conditions, but basically:
- All should be soaked and in the dark for several hours (legumes, about 12 hours; the rest, between 6 and 8 hours).
- They are drained, they are deposited on a kitchen paper to dry them and they are distributed on the base grid of the germinator. Keep in mind that when they germinate they will occupy three times their space. Don’t put them too close together.
- The bucket is filled with water, and the grid is positioned so that the water touches the bottom of it. It covers itself with its cover.
- The ideal temperature is between 20 and 25 degrees and should remain stable throughout the germination process. It is advisable to renew the water every three days.
- When the sprouts grow to the height of the lid, you can remove it and keep it open. You can now cut sprouts for your consumption.
- Refill the bucket when needed to keep the same water level.
In glass jar
To germinate in a jar, we will need a glass jar with a minimum volume of one liter.
- We put the seed and cover with half a liter of water (the water should occupy three times more than the volume of the seed approximately).
- We cover them with a gauze or cotton cloth and a rubber band and keep it in the dark during the soaking time that each seed requires (12/14 h. For legumes, 6/8 h for the rest).
- Drain the water (the fabric will prevent the seeds from coming out) and rinse well with warm water.
- The seeds are arranged along the wall of the jar and put back in a dark and warm place, rinsing them two or three times the first days and then once a day. The water must always be drained very well.
- When the shoots are 2 to 3 centimeters long, they are exposed to indirect sunlight for about 2 hours so that the leaves turn green.
More information – Seed collection
Source – green is life